Digital imaging tools can help
restore old photos to their
former colorful glory
Film stocks shift color over the years, and many of the color images in our family scrapbooks are fading into a sepia mushiness. Many folks buying inexpensive digital cameras and computer scanners copy these pictures in hope of preserving them, and often when they're saved or reproduced in books they are presented "as is." But simple digital-imaging techniques can help restore the true colors of photos. Digital imaging has advanced so much over the last decade that computers can now perform a kind of pictorial archaeology.
The first step, though, is making your computer monitor approximate what the finished pictures will look like. There are any number of expensive monitor color-calibration devices out there, and lab techs can natter on endlessly about lumens and RGB/CMYK-shift and whatnot, but for basic grunt work, you can adjust your monitor by working backward.
There must be a digital picture, preferably showing someone's skin tones -- we'll get to the WHY of that farther down -- that you've shot and printed out with results that please you. Call up the picture on your monitor, hold the print of it next to the screen and tweak the monitor controls until the image on the screen matches most closely the same image in your other hand. This is rough and ready calibration, but it gets you in the ballpark.
Now, for those old images. Unless you have carefully preserved Kodachromes, old slides and prints generally fade into a muddy reddish hue, particularly if the picture was shot on a volatile film like Anscochrome. What's important to remember is that the color information is often still resident in the image and can be brought back. Maybe not all the way, but certainly better than the way it is usually presented.
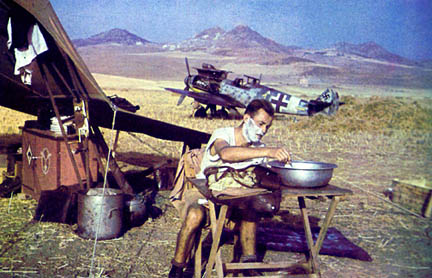
This photo above has been tweaked using Adobe Photoshop, manipulated to enhance natural skin tones. The original version, scanned from a book, is shown below, labeled Photo A.
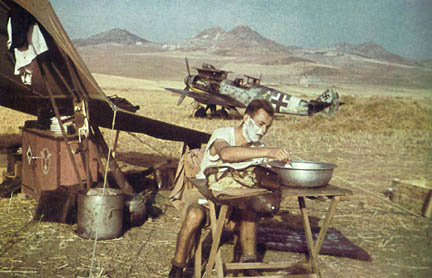
The same photo is shown using Adobe Photoshop's "Auto Levels" function.
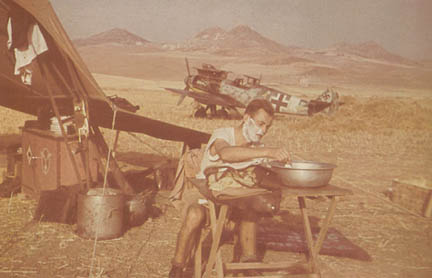
This photo was scanned directly out of a book, typical of the way old color pictures are presented. It's brownish, faded and almost looks like a sepia image.
The photos (above) show what can be done.
Photo A: This a picture from World War II, of a guy relaxing in front of his airplane. It's scanned directly out of a book and is typical of the way old color pictures are presented in books these days. It's brownish, faded and almost looks like a tinted black-and-white image. One important element, however, is the image of the man in the foreground.
Although you can try to readjust the color using the electronic tools in a program such as Adobe Photoshop, these programs have automatic algorithms built in that sample the photograph's histogram and compute a full range of colors.
Photo B: This shows what happens to the image when Photoshop tweaks the colors automatically. It's not great, but it's better than it was, and took only a few seconds. (The command is "Auto Levels.")
The next step is trickier, and much depends on the color accuracy of your monitor. You shift the color parameters of the various hues in the image until it looks more accurate. You can try to use a blue sky as your guide (but that's not always true) or green grass (but that's not always the case) or other familiar elements such as a flag or national insignia (ditto).
The key image here is the man. Photo editors know that we're extraordinarily sensitive to the way skin tones are presented in photo reproduction. The trick here is to balance the hues until the skin color "looks right," and if it does, the rest of the image falls into place. Flesh color becomes our color-exposure card. If the flesh color is off, the rest of the picture will look wrong.
Photo C: Shows the image with the skin color skewed toward a more realistic shade (at least, on my monitor at the newspaper; press reproduction is something else). It's still a long way from a completely ranged color exposure (the highlights are blown out, and the shadows look faintly magenta) but it's a much more accurate representation of what the photographer saw through his viewfinder.
If you have a bunch of photos shot at the same time, from the same roll of film, find an image with a human face in it and adjust your color. Keep track of the changes in that photograph, and apply the same tweaks to the rest of the roll.
Click for online
calendars and events.