A gift made by a child's hands is priceless, but a child's hands are not necessarily the most coordinated, which leads to many indefinable blobs of artwork created for Mother's Day. Mother, of course, will love her gift, even if she's secretly thinking, "I wish it were chocolate." In the few days left before this year's holiday, consider these projects that produce sophisticated results very simply. They are inspired by "Semi-Homemade Desserts" by Sandra Lee (Miramax Books, 2003) and www.pillsbury.com, which offers many more easy ideas.
Candy Bouquet
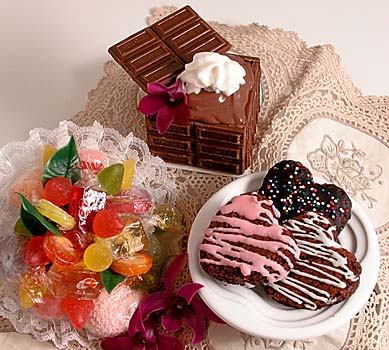
Ages 3 to 6Present Mom's favorite candies in this bouquet, which makes a nice centerpiece at Sunday brunch. She can also take it to work and munch off of it for a week, all the while showing her co-workers how clever her child is.
The candies in this bouquet came from Aji Ichiban in McCully Shopping Center and the dollar aisle at Daiei. Aji Ichiban offers colorful candies by the piece, many of them mochi or other soft sweets, which are perfect for this project.
Materials: A bouquet form (made of plastic and foam; sold at craft supply stores), plus assorted candies and toothpicks or floral wire.
Assembly: If candies are soft and the child is very young, let the small one spear wrapped candies with toothpicks to secure them to the foam center of the bouquet. Continue until the foam is covered (when the child is not looking you can re-arrange the candies into an orderly design). With older children, candy can be re-wrapped in clear plastic wrap and twisted closed. Wrap florist wire around the twisted ends and spear into foam. Small lollipops are a good choice; simply shorten the sticks and poke directly into the foam.
Chocolate Box
Ages 7 to 10Fill this box with ice cream, mousse, truffles or other candies. Or, the box can be made smaller and used to hide a non-edible treat -- diamonds are always nice.
Materials: Three 1.5-ounce chocolate candy bars, a container of prepared chocolate frosting and a plastic knife.
Assembly: Break candy bars in half (it's easiest if you buy the type that are divided into sections, such as Hershey's or Cadbury). Place one section on a flat surface to make the box bottom. Stand four chocolate sections around the bottom to make the sides. Coat the edges of all the sections with frosting, using the plastic knife, then press the pieces together to secure. (You may need to shorten some of the pieces so they fit evenly -- an adult should do this, using a sharp knife). The last piece of chocolate becomes the cover.
When the frosting dries in a few minutes, the box will be quite secure. Until then, you might need to prop up the sides.
Brownie Hearts
Ages 10 and upMaterials: One 1-pound box brownie mix, one container prepared frosting, candy sprinkles, heart cookie cutter and foil. You'll also need eggs, water and oil, as indicated on the brownie package, plus a cake pan, mixing bowl and spoon.
Assembly: Cover the bottom of a 9-by-13-inch cake pan with foil. Prepare the brownie batter according to the package directions and pour into pan. Bake as directed.
Cool brownies completely, then use the foil to lift them in a single piece from the pan. Cut into heart shapes (if the brownies seem too soft to cut, place in the freezer for a few minutes).
Melt frosting in microwave (this takes just a few seconds; do not boil). Pour or drizzle frosting over brownies, then decorate with sprinkles. Frosting will harden as it cools. It's best to work with a small amount of frosting at a time as it cools quickly and should not be reheated.
Click for online
calendars and events.