Advertisement - Click to support our sponsors.

SOMETIMES, thinking too much about something can mess you up. Sometimes, it's better to get physical rather than cerebral.
The perfect pie crust recipe
By Cynthia Oi
Star-BulletinIn this case, the something is pie crust.
While pumpkin pie takes second billing to turkey at Thanksgiving, without it, the food extravaganza wouldn't be the same. Few desserts exude homey-ness like pie and Thanksgiving is all about home and family and gorging.
Pies are unfussy and as such should be simple to make. Well, they are and they aren't. This is where body over brain comes in.
I'm not a good baker, so for me to make a good crust is a challenge. Thus, my editors reasoned, if I can master crust and tell about my mistakes, other crust-challenged people would benefit. (I think they just wanted to make fun of me.)
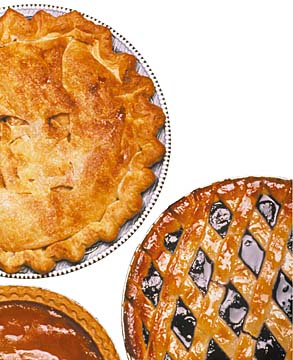
Jeffrey Steingarten, in his 1997 book "The Man Who Ate Everything," writes that the " ... perfect American pie crust must be seven things at once -- flaky, airy, light, tender, crisp, well-browned and good tasting."
It seemed like a lot to ask. But I researched cookbooks, monitored The Food Network, checked the Internet and consulted pastry chefs.
The main rules I gathered regarding making pie crust:
1. Handle the dough as little as possible.
Travis "Ala" Sutton, a pastry chef who studied at the French Culinary Institute in New York, advised "be really gentle. Put together the ingredients without mixing it too much. Don't play with it. Don't be rough. Treat it like a baby." I can be gentle, I swear I can.
2. Measure ingredients carefully.
Steingarten in his chapter on pie insists that ingredients be weighed rather than measured, but I don't have a scale and wasn't about to buy one.
3. Chill the butter or shortening and the water before combining with the flour.
The theory here is if the fat is cold, the water it contains won't leach out into the flour as quickly. Water, it seems, causes flour to form this thing called gluten, which is bad, bad, bad for crusts. But to make dough, water in small amounts must be added. Martha Stewart says chilling the water also helps stem gluten formation. I had no problem with chilling. I even keep my flour in the fridge.
4. Chill the dough.
This is supposed to make the dough more tender and easier to work with. The problem is how long do you chill? In the "Pies and Pastries" segment of the "The Joy of Cooking," "up to 12 hours" is recommended, but the book's several recipes for crust set different standards. One calls for chilling at least 30 minutes, while another says 2 to 36 hours. Betty Crocker says up to 1 hour; Martha recommends freezing, but she's nuts. If you can figure out the correct chill time, the next problem becomes how long do you wait before rolling out the dough? Most of the cookbooks say to wait until the dough is room temperature, but the dough ball may be room temperature on the outside and still cold on the inside. Furthermore, room temperature in Hawaii in July is way hotter than room temperature in Maine in October.
5. Bake crusts in non-shiny pans to get better browning.
I have old pans and they are definitely not shiny.
The first try
After I'd read, analyzed and compared, I was ready to make pie.The first attempt was on a Saturday in July when blueberries were affordable. The filling was easy, the crust was hard -- literally.
The weather was hot and humid and the dough turned sticky. I countered by adding more flour, which required me to break rule No. 1. I handled gently, but handle I did, until I could gather up the dough into a ball as directed.
The recipe called for a resting period of 2 to 36 hours. I opted for 24 hours because that's when I next had time for pie making.
I brought the dough to my sense of "room temperature." This didn't take long because Sunday was just as hot as Saturday.
I did not use the pastry cloth or the roller stocking as was "highly recommended" in the directions. Maybe I should have, because although I'd sprinkled the counter top liberally with flour, rolled the dough from the center to the edges, as directed, and although I did this very gently, the dough stuck to the surface.
Using a spatula, I finally got the stuff into the pie pan. It was ragged and holey, so I patched it as best as I could. I rolled out the top crust and, of course, that was even stickier because room temperature was now 10 degrees higher than when I'd started. Again, I patched pukas. It was not going to be a pretty pie, but I thought that maybe at least it would taste good.
Not so. For one thing, the filling leached from between the crusts. The blueberry liquid not only made a hard puddle in the bottom of the oven, it glued the pie to the pan. Getting a piece out was not going to happen, so I forked a bite from the whole pie to get a taste.
The filling was tangy and sweet. The crust was a disaster. It was neither flaky, nor airy, nor light, nor tender, nor good tasting. It was somewhat crisp and well-browned but that was only because of the filling overflow.
Trying again, and again
I reassessed. Maybe I was being too ambitious. I had picked a recipe called "Pate Brisee" because it sounded sophisticated.So I down-shifted. I decided that since this story was for Thanksgiving and pumpkin pie has only one crust, I would only do one-crust pies. The recipe I chose came off the label from the Crisco package.
This time the dough came together well with less sticking than the "Pate Brisee." I rolled out the dough, chanting "gently, gently" to myself. I crimped the edges, poured in the pumpkin, slid the pie into the oven and waited.
An hour later, the pie emerged. The crust looked pale, but the aroma was heartening. When it had cooled, I cut a slice. The exposed crust was crumbly, the part under the pumpkin was soggy. It tasted under-cooked, grainy and mushy.
I downshifted again. I would just bake crust. No filling
I tried the Crisco one again. Though still pale, the unfilled crust was flakier and light, but it had no taste at all. Betty Crocker's was next, but wasn't much different, also pale and tasteless.
Despairing, fearful of failure, I stopped crusting for a few weeks.
Success!
I later went back to Steingarten's book and re-read his pie chapter. He had found pie paradise in a recipe from Marion Cunningham, which he said breaks every rule for pie crust. He had adjusted it for himself, and I thought I'd give his a go, but the guy seemed kind of obsessive and his recipe goes on for eight pages.I'd seen photos of Cunningham, author of "The Fannie Farmer Cookbook" and "Learning to Cook with Marion Cunningham," and she looked like a no-fuss person.
I figured if Steingarten started out with Cunningham, I would, too.
Her method has a low Martha factor; no pastry cutters, food processors or chilled marble slabs. A bowl, measures, a fork and a rolling pin are all she uses; her principal tool are her hands. Also, her recipe has no chill time.
"Even if your first pie crust is not quite as light and flaky as it will be after you've made a few more, your first attempt will surprise you," she writes, soothingly. "Just get your hands into the floury bowl, follow the instructions, and don't court failure by worrying."
It occurred to me then that I over-analyzed and fretted myself out of balance. I am quite comfortable in the kitchen. I usually don't think about cooking, I just cook.
I took a deep breath and made her crust. I measured the ingredients quickly, dumped the flour in the bowl and dropped in the shortening. I worked all of this through my hands as she instructs. I rolled the dough -- no sticking! -- and plopped it into the pan.
I baked it, cooled it and tasted it. It was "flaky, airy, light, tender, crisp and well-browned." Six out of seven -- not bad. "Good-tasting" was elusive, but I sprinkled the next crust with a little bit of granulated sugar. That little bit of sweetness made all the difference.
Feeling confident, I moved to fill the pie with pumpkin. Again, the bottom was a bit soggy.
Pastry chef Sutton had suggested blind-baking the crust for a few minutes before adding the filling. Edging the exposed crust with foil may be necessary toward the end of baking to prevent burning.
Instead, I put the rack on the lowest level in the oven and jacked up the temperature to 475 degrees. I baked the complete pie for 10 minutes at that heat, then lowered it to 350 for the rest of the cooking time, about 50-55 minutes.
The crust was crisper on the bottom, but still not flaky. I stewed. Then I recalled Sutton's warning: "With pumpkin pie you can't escape soggy crust because of the pumpkin and because the pie sits before you serve it. Maybe you should eat it right away."
That, I can do.
This recipe, from "Learning to Cook with Marion Cunningham (Alfred Knoff, 1999, $29.95), yielded the best result: The best tested crust
Marion Cunningham's Pie Crust
1-1/4 cups all-purpose white flour
1/4 teaspoon salt
1/3 cup vegetable shortening
1/4 cold water or a little morePut the flour and 1/4 teaspoon salt in a large mixing bowl and stir them around to mix.
Fill a 1/4-cup measure with shortening. Scoop the shortening out of the cup with your fingers and put it in the bowl with the flour. Rub some flour on your hands, then roll the shortening around in the flour so the fat isn't too sticky to handle.
Break the shortening into 4 or 5 smaller pieces and coat them all with the flour in the bowl. Now lightly rub small pieces of the shortening and the flour together with your fingers for about a minute to make little lumps. If there is loose flour at the bottom of the bowl, scoop it up to the top with your fingers and rub shortening into it to make more lumps.
Continue scooping up and rubbing, working lightly, letting the bits of shortening fall back into the bowl. When most of the flour and shortening have been transformed into lots of little lumps and the dough looks like grated cheese, you've mixed enough.
Sprinkle the cold water over the dough and stir with a fork all around the sides and bottom of the bowl so no dry flour remains hidden. Stir until the water is mixed into the flour and has disappeared. Reach down to the very bottom of the bowl and gather up all the dough. Pat and press the dough until you have a ball of dough. If some of it is still so dry that pieces fall away, sprinkle that area with a little more water and gently press and pull the dough apart, sprinkling a little more water on it. Pat it into a ball again.
Sprinkle a large cutting board or a counter top lightly with a small handful of flour. Spread the flour into a circle bigger than your 9-inch pie pan.
Put the dough in the center of the circle of flour. Flour the rolling pin. Flatten the dough a little with the pin, then begin rolling from the center out to the edges to make a circle. Don't roll back and forth. Move the dough now and then to make sure it isn't sticking.
If it is sticking, slide a metal spatula in a wiggling motion under the dough to loosen it. Sprinkle more flour on the surface, then continue to roll the dough into a big circle, about 1-1/2 inches larger all around than your pie pan.
To make sure, put the pie pan upside down in the center of the dough and check that your circle is about the right size. The dough will be about as thin as a cracker.
Roll the dough around the rolling pin. Lift the pin up and center it over the pie pan, then unroll the dough into the pan with the fold in the center of the pan. Now unfold the dough against the inside of the pan and pat the dough all around the inside edge to fit snugly.
Now fold the hanging dough back up onto the rim to make a double thickness of dough around the edge of the pan. Be careful not to tuck the dough under the edge of the pan, which would make it hard to dislodge after baking.
When you have neatly folded the dough all round the edges, press indentations into the dough, squeezing the edges together, to make a scalloped edge.
Your crust is ready for filling.
Nutritional information unavailable.
Click for online
calendars and events.