
Creativity unmasked
By Suzanne Tswei
at Halloween
Special to the Star-Bulletin
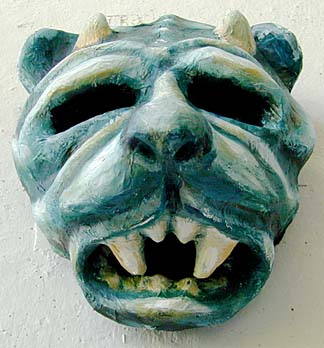
YOU CAN NEVER TELL JUST BY looking that the furry face of the lion cub came from bits of torn cotton balls. Or that the cute cub's face is nothing more than strips of old newspaper and a brown paper bag, some acrylic paint and pieces of fishing line for whiskers.
Such is the ingenuity Art 101 associate professor Debra Drexler sees in her students right before Halloween. Drexler designed a mask-making project to give the students an introduction to seeing and creating art. The results often have been amazing, and for the past five years the chief curator of The Contemporary Museum, Jay Jensen, has selected dozens of masks to exhibit at the museum's cafe.
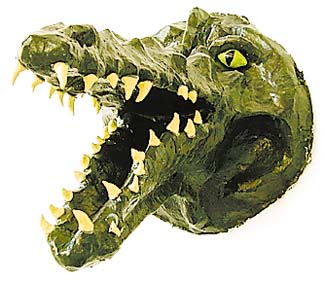
"Metamorphic Menagerie V," which opens Tuesday, showcases papier mache masks that range from the realistic to the fantastic. There will be 63 masks of birds, fish, tigers, snakes and other animals, real or imagined.
Making a mask isn't as difficult as you'd think. You need patience, a little imagination, some inexpensive supplies and basic techniques, Drexler says.
"Anybody can make masks and get great results with simple techniques," she says. "These students often never made masks before ... . A lot of the times they don't even come with much art training or experience."
It isn't too late to make a mask for Halloween if you get started soon. Using Drexler's formula, you'll need the following supplies:
Step 1 -- Decide what kind of mask you want to make. Drexler directs her students to the zoo or pictures of animals as a starting point. Making sketches of the animal's face helps you figure out its three-dimensional features.Newspaper and brown paper bags. Optional, industrial-type paper towels.
Step 2 -- Wad up handfuls of newspaper to make a round form. This is the base for you to build up a clay mold to shape your mask. Cover the form with clay about 1 inch thick. Create an animal face by sculpting the clay.
Add clay to create protruding features, such as a snout or forehead. Or dig away clay to create crevices or depressions, such as eye sockets or nostrils.
Step 3 -- Cover the clay form with a layer of plastic wrap after the sculpting is completed. The plastic will allow you to remove the papier mache mask from the clay form later.Step 4 -- Tear newspaper and brown paper bags into strips, about 1 inch wide. Dip the strips into the wall paper paste and cover the clay form tightly with the strips. Be neat and smooth out the ridges to avoid making a bumpy mask.
Cover the clay form with four layers of paper, using newspaper for one layer and then brown paper for another. Using different papers for each layer lets you keep track of the progression of layering. The brown paper bag also adds strength. You may wish to do a fifth layer with a soft paper, such as industrial-type paper towels, to create a soft and smooth final surface.
Step 5 -- Allow the papier mache mask to dry. Depending on the weather, the mask may dry as fast as a few hours. Put it out in the sun, or use a fan or hair dryer to speed up the process if necessary.
Step 6 -- Remove from the clay form as soon as it is dry. Don't wait until the clay also is dry. That makes separating the paper and clay more difficult. If dry clay is stuck to the mask, chip off the clay carefully.
Step 7 -- Use making tape to strengthen the edge of the mask. Tape along the rim.
Step 8 -- The mask is ready for painting and embellishing. Drexler suggests painting the mask in one solid color first to provide a base for more coloring. To create realistic results, use different colors and darks and lights. For example, it's best to use different browns and a few other colors if you are trying to make a brown bear. Using just one brown will give a flat look to the mask.
You can create the look of fur and different skin textures with paint and a small brush. It takes more time but Drexler says the results are worth it.
Adding fake fur or brushed out yarn will give additional interest to the mask, if you wish. Use clear fishing line, painted black or other colors, to imitate whiskers.
Step 9 -- Cut holes for eyes and breathing. Make a small hole on each side of the mask to attach the elastic for wearing.
If you can't get started this year, you can always visit the exhibit for inspirations for next Halloween.
On Exhibit
Click for online
calendars and events.

