Star-Bulletin Features


Monday, August 17, 1998


By Kathryn Bender, Star-Bulletin
Jingle Gonzales weaves multi-colored ribbon leis to
give away. She says she likes the non-floral garlands
because they last "forever."


Braiding Beauty

A Pearl City woman makes crafty
use of her bus ride to work,
weaving leis for friends

By Kekoa Catherine Enomoto
Star-Bulletin

Tapa

AT the back of the No. 1 or No. 8 bus, en route to Hawaii-Kai or Waikiki, you may have seen a demure young woman with deft hands absorbed in silent, gentle looping. She sits weaving long strands of satiny ribbon into a tiny symphony of color and shine.

"This is what I do," says Jingle Gonzales, "and by the time I am at my work, I'm not bored."

The nursing assistant from Pearl City with the happy name of bells attends elderly patients at the end of both bus lines. And on the rides from her Pearl City home to her job, she braids neat, even folds of overlapping visual harmonies.

Her ribbon lei requires no flower picking, no needle, no string, no refrigerator. It takes 12 yards of 1/2-inch-wide satin ribbon -- with or without tiny looped fringe -- at about 23 cents a yard, as well as a bit of manual dexterity and practice.

Total cost: $2.87 per lei.

On TheBus, Gonzales' rhythmic touch intrigues other riders.

"They keep asking me how to do it," says the 23-year-old Pearl City High School graduate who emigrated from Manila in 1992.

"They say it's pretty, nice, neat. They ask me, 'What's that for?' I say, 'For my friend.' "


By Kathryn Bender, Star-Bulletin
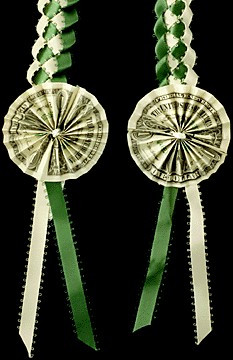
The finished leis have dollar-bill fans attached to the ends.


Gonzales prefers an open, green-and-ivory ribbon lei with dollar-bill fans at the ends to give to male cousins or friends. She says the lei resembles strands of maile.

On the No. 1 bus, she finishes a green-and-white lei for a cousin graduating from the University of Hawaii. She also made another lei for a cousin finishing his medical residency in Minnesota.

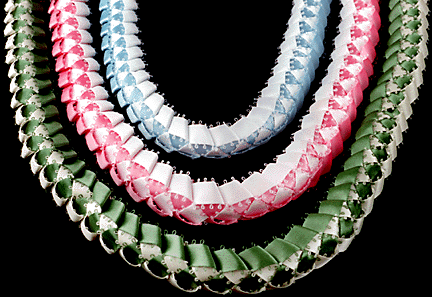
A lei maker can weave a garland in an honoree's school colors. Gonzales' own favorite combination is pink and white, but any color combo will do.

Her lei helps conserve flowers, ferns and other greenery that sometimes may be over-picked and that can be quite expensive, depending on the time of year.

Gonzales prefers her ribbon creations to the floral garlands.

"It's so easy, and I find it's better to give away than fresh flowers because they can keep it," Gonzales said. "This is forever."

She said she takes 20 to 30 minutes to finish a braided lei, but a time test recorded 14-1/2 minutes flat. Nimble fingers.

Tapa


Photos by Kathryn Bender, Star-Bulletin
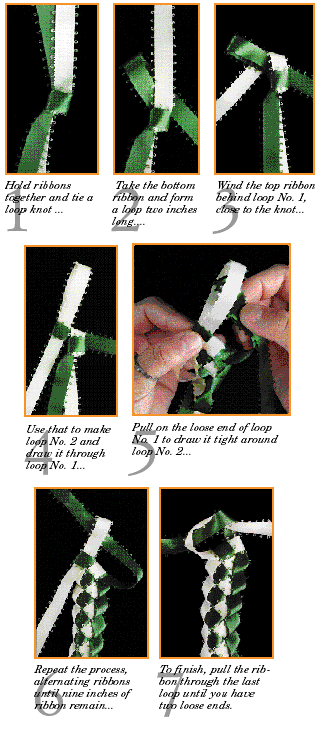
To weave a lei

Here's how to make the lei:

Buy six yards each of two different colors of ribbon.

bullet Hold the ribbons together and tie a loop knot, with six inches of ribbon left for finishing the lei. (Photo No. 1)

bullet Hold the knot -- smooth side up -- with your right hand, with the longer strands facing away from you.

bullet With the left hand, take the bottom ribbon and form a loop two inches long (loop No. 1) with the loose ribbon end underneath. Do not twist the ribbon when making loops. (Photo No. 1)

bullet Then, hold the ribbons in place with the left hand, and use the right hand to pull the top ribbon to the right. Wind the ribbon tightly behind loop No. 1, close to the knot. (Photo No. 3) Switch to hold the ribbons in the right hand.

bullet To make a loop, draw the ribbon on the left toward you between your left-hand thumb and forefinger, with your thumb on the top. Loop the ribbon under itself, and hold with forefinger on top and thumb on the bottom with the loose end hanging down. Fold loop up and push through loop No. 1. When you are pushing one loop through the other loop, the loose end is always on the top.

bullet Holding the loops with the right hand, use the left hand to pull the end of the ribbon of loop No. 1 snug, to anchor loop No. 2. (Photo No. 4) If necessary, tug on the bottom part of the bigger loop to draw all ribbons snug. Also, check the underside of the pattern to make sure you're pulling the ribbons neatly and tightly enough.

bullet Switch ribbons to left hand. With the right hand, use the ribbon on the right to form another loop (No. 3) and push it through loop No. 2. Switch hands again. Pull the end of loop No. 2 with the left hand to anchor loop No. 3.

After each looping, you will switch hands to pull the ribbon snug. Each loop is made with alternating ribbons.

bullet Repeat this process, (Photo No. 5) switching until nine inches of ribbon remains at the end.

bullet Pull the ribbon which was to be looped next straight through the last loop until you have two loose ends.

bullet To finish an open neck-lei, (Photo No. 6) tie the two ribbon ends twice to form a knot at each end of the lei. Attach a dollar bill rosette or fan.

bullet To finish a closed neck-lei, take a ribbon from one end of the lei and a different-colored ribbon from the other end of the lei and tie them together twice to form a knot. Over the knot, attach a bow. Take the two remaining untied ribbons and tie once under all of the knots to conceal.

bullet To make a fan, fold a clean, crisp dollar bill along the shorter edge into 1/4-inch pleats. Fold the pleated bill in half, and use a 16-inch length of 1/4-inch-wide ribbon to tie around the middle of the pleated bill. Fan out the pleats. To make a pleated circle, secure the joined sides with glue, tape or staples. Use the 1/4-inch ribbon ends to tie the fan onto the lei.


Do It Electric!


E-mail to Features Editor


Text Site Directory:
[News] [Business] [Features] [Sports] [Editorial] [Do It Electric!]
[Classified Ads] [Search] [Subscribe] [Info] [Letter to Editor]
[Stylebook] [Feedback]


© 1998 Honolulu Star-Bulletin
http://starbulletin.com